The forecast tool allows managers to keep track of their team's progress towards reaching their goals. To use the forecast tool, you will first need to set up forecast categories for each of your sales pipelines, then set revenue goals for your team members.
Please note: to set up the forecast tool and edit your forecast categories and settings, you must be a Super Admin. Users with Forecast permissions can view and make changes in the forecast tool, but cannot edit the forecast categories and settings.
Set up your pipeline's forecast categories
Forecast categories allow you to group your deals into categories that represent a deal's likelihood to close. Users can also manually update the forecast category for an individual deal from the deal record. To set up your forecast categories:
- In your HubSpot account, click the settings icon settings in the main navigation bar.
- In the left sidebar menu, navigate to Objects > Forecast.
- Click the Select a pipeline to set forecast categories dropdown menu and select a pipeline to modify.

- To choose which columns and forecast categories are displayed in the forecast tool, in the Customize forecast column section, click Customize. In the dialog box, select the checkboxes to the left of the categories you want to display, then click Save.
- To set either a monthly or quarterly forecast period for this pipeline and the revenue goals, next to the Set the forecast period for this pipeline setting, click the dropdown menu and select a time period.
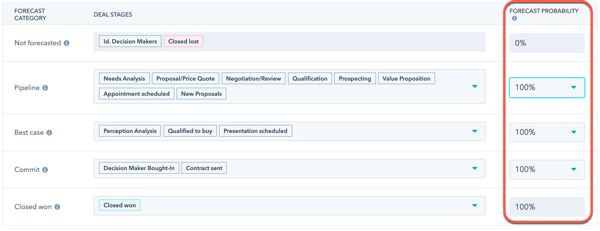
- Use the category dropdown menus to organize your deal stages into one of four forecast categories. Select/clear the checkboxes next to the deal stages to include.
- Pipeline: deals that are in the pipeline for the current time period, but not included in the forecast.
- Best case: deals that will close in the best case scenario, but are even less certain than most likely deals.
- Commit: deals that have a high likelihood of closing and have been committed to the forecast.
- Closed won: deals that have closed within the forecasted time period.
- To add weighting to your forecast categories, next to the category, click the Forecast probability dropdown menu and select a percentage. Weighting places emphasis on the deal forecast amounts based on their assigned forecast category.
- Above the forecast category mappings, you can update other default settings:
- To automatically update the forecast categories when a deal moves to a different deal stage, click to toggle the Automate forecast categories switch on. With this setting turned on, a workflow will be created in your workflows tool. The workflow is named Forecast Category Mapping for Pipeline: [name of pipeline].
- To apply your forecast categories to your existing deals, click to toggle the Apply to existing deals switch on.
Please note: you can clone and edit the default workflow that are added to your account when the Automate forecast categories switch is turned on. If you clone and edit the default workflow, it is recommended to turn off the Automate forecast categories switch so your custom automation will apply instead.
- Click Save.
Moving forward, your deals will be categorized into one of the forecast categories based on their deal stage.
As a rep works on a deal, they might re-evaluate the forecast category assigned to the deal and decide that another category better represents the deal's likelihood to close. They can manually update the forecast category for an individual deal from the deal record:
- In your HubSpot account, navigate to Sales > Deals.
- Click the name of a deal.
- In the About section in the left sidebar, click View all properties.
- Search or browse for the Forecast category property, then click the dropdown menu to select a different category.
- In the bottom left, click Save.
Edit the forecast categories
HubSpot's default forecast categories include Most likely, Best case, Pipeline, and Commit. If you want to edit the category labels or add another category, you can edit the Forecast category property.
- In your HubSpot account, click the settings icon settings in the main navigation bar.
- In the left sidebar, navigate to Objects > Properties.
- At the top, click the Filter by dropdown menu and select Deal properties.
- Search for the Forecast category property, then hover over the property and click Edit.
- In the right panel, you can enter a different value for one of the existing properties. Or you can click Add an option and enter a new forecast category value.
- Click Save.
In addition to Not forecasted and Closed won, only five additional categories will appear in your forecast category mapping. Specifically, only the last five property values will appear as categories that you can map to in your forecast settings. If you have more than five additional categories, you would need to drag and drop your property values to one of the last five positions in the property's settings in order for it to appear in your forecast settings.
Please note: while only the last five forecast categories will appear in your forecast settings, you can select any forecast category when manually updating a deal record's Forecast category property.
Keep in mind that the order of the categories will impact the Deal change history report in your sales analytics tool. Specifically, deals must move through the forecast categories in order, from top to bottom, to count as a deal whose forecasted amount moved forward. For example, if the order of your categories is Best Case, Pipeline, then Commit, when the deal moves from Best Case to Pipeline it will be counted as a deal whose forecasted amount moved forward in your Deal change history report for the selected time.
Set revenue goals for your sales team
Please note: you must be a Super Admin in order to create, edit, and delete goals in your account.
Once you customize your forecast categories, you need to assign revenue goals to your team.
- In your HubSpot account, navigate to Sales > Forecast.
- In the upper right, click the Edit goals.
- In your Goals settings, click Create in the upper right.
- Learn how to finish creating revenue goals for your team.
When you're done setting up your forecast categories and assigning revenue goals to your team, learn more about using the forecast tool.